


How to Cut Oversized Porcelain Without Losing Pieces or Money
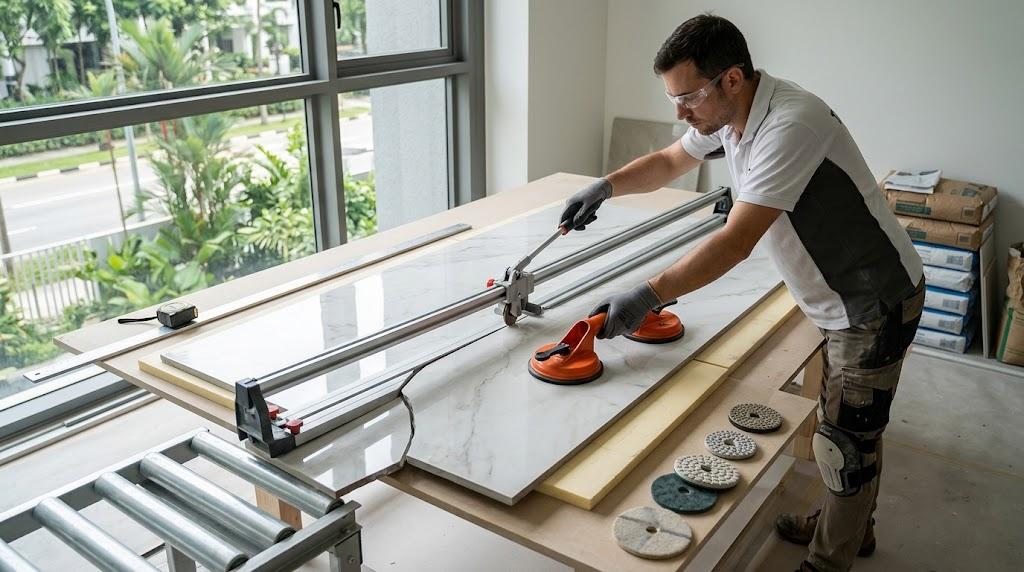
Oversized porcelain panels dominate contemporary renovation briefs for good reason. The continuous surface, the minimal joint lines, and the clean geometry speak for themselves. Walk through any recent showroom or upscale apartment, and these panels anchor the design. Yet behind every polished feature wall sits a fabrication process that punishes unprepared hands.
The gap between a delivered panel and an installed one is filled with risk. One heavy-handed pass with a dull blade and the glaze splits across the face. A poorly set up workbench lets gravity do the damage before the blade even reaches halfway. Understanding how to approach each cut methodically is the difference between a clean install and a pile of expensive waste.
What makes these panels tricky
Porcelain slabs exceeding 15 inches on a single side do not behave like their smaller cousins. The larger the panel, the more internal stress it carries from the firing process. Those stresses sit quietly inside the body until a blade introduces a line of weakness. At that point, they release in unpredictable directions and can crack well beyond your intended cut.
Modern production has pushed thickness down considerably. Many panels today measure between 6 and 9 millimetres, which keeps weight manageable but introduces serious fragility. Large format tiles at these thicknesses will deflect under their own mass if the surface beneath them is not perfectly flat. That deflection alone can seed a fracture you will not notice until later.
Starting material quality sets the upper boundary for every cut you make. Warped, poorly dried stock is virtually impossible to work with regardless of your skill level. A trustworthy tile shop in Singapore will have already screened its inventory for flatness and kiln consistency. That screening removes the single biggest variable before you even unbox the panels.
Tools built for the job
A standard snap cutter designed for small bathroom tiles will fail immediately on a 1200 by 2400mm panel. Its rail is too short, and the breaking foot cannot manage the span. You need equipment engineered for this scale.
- A professional rail cutter featuring a long, rigid guide rail and a tungsten carbide scoring wheel.
- A wet saw with consistent water circulation for all complex cuts and penetrations.
- A continuous rim diamond blade rated specifically for porcelain rather than general masonry.
- At least two heavy-duty suction cups to lift and shift panels without introducing flex.
Blade and saw compatibility matters more than most people realise. Check that the diameter and arbor size of your blade match your saw's specifications before starting. Staff at a specialist tile shop in Singapore can point you toward the correct pairing for your setup. Mismatched equipment creates vibration that translates directly into chipped, uneven cuts.
Why the work surface is the real hero
Warping during cutting almost always traces back to inadequate support beneath the panel. Imagine a wide slab resting on two points with open air beneath its centre. As the blade advances into that unsupported zone, the offcut section drops. The bending moment transfers backward into the piece you want to keep, and it fractures.
A cutting table with adjustable rollers is purpose-built for this exact scenario. If that is not available, lay a thick sheet of rigid foam insulation board over any flat surface. Professional crews at every level use this approach because the foam provides complete, even support without marking the glazed face.
When a cut runs through the middle of a wide panel, neither side can hang unsupported. The offcut piece will drop the instant the blade breaks free. A roller stand or a second person positioned to catch the separated section prevents this entirely.
Scoring and snapping by hand
Straight cuts are where a rail cutter earns its place in your kit. Preparation starts with surface cleanliness. Dust and grit trapped under the scoring wheel or breaking pad chips the glaze along the entire line. Large format tiles magnify this issue because the score travels such a long distance.
Mark your line, align the rail carefully, and lock it down. Draw the scoring wheel across the surface in one smooth, continuous stroke. Going over the line a second time fractures the glaze and virtually guarantees a rough break. Listen for a steady scratching tone throughout the pass. Any shift in pitch tells you that hand pressure is inconsistent.
Position the breaking foot directly over the score line once you finish. Apply firm, even pressure in a single controlled motion. Jerking the handle sends uneven stress along the score and produces unpredictable results.
Getting precise results from a wet saw
Holes, notches, L-cuts, and corner removals all require a powered blade with water cooling. The most common error is feeding the tile too aggressively. Pushing fast generates friction heat that creates invisible micro-fractures beneath the glaze. These flaws can surface weeks after installation.
Water flow must remain constant and abundant throughout every cut. The stream cools the blade and clears away the abrasive slurry that would otherwise score the cut edge. A weak pump or a dry blade will burn through the porcelain surface almost instantly.
Seasoned fabricators use a simple trick: lay painter's tape along the intended cut line and mark on top of it. The tape holds surface glaze in place and reduces breakout noticeably. Most chipping occurs where the blade exits the far edge, so ease your feed rate as you approach that point.
For L-shaped cuts, always cut the shorter leg first on the wet saw. Snap the longer leg with the rail cutter afterward. This sequence preserves the corner and is standard practice across professional workshops.
Handling and transport
Panels are most vulnerable during the moments between cuts. Large format tiles are heavy and unwieldy, and gripping them by their edges introduces flex. That flex embeds stress into the body that a blade will exploit later. Use paired suction cups for every lift and every reposition.
Store panels vertically on padded A-frame racks at all times. Never rest them flat on a workshop floor where a dropped wrench or a misstep could crack the face. Vertical storage is not a recommendation—it is a requirement for keeping these panels intact.
When arranging delivery, ask your supplier about packaging standards. A reliable tile shop in Singapore will ship on padded A-frames with corner protection built in. Sound logistics between warehouse and workspace prevent a surprising volume of breakage.
Rescuing a chipped edge
A small chip along a cut edge does not mean the panel is lost. Diamond hand polishing pads restore rough edges to a smooth, factory-like finish. Start at a coarse grit around 50 or 100 to remove the jagged material. Step through progressively finer grits until you reach 3000.
The entire process takes roughly ten minutes per edge. That time investment recovers the full material cost of the panel. Most professional installers carry a compact polishing kit for exactly this purpose.
If you struggle to find the right pads, a well-stocked tile shop in Singapore will usually carry them. For face chips rather than edge damage, colour-matched epoxy resin fills the void effectively. It remains faintly visible upon close inspection but eliminates the stark white gouge that catches the eye from a distance.
Work with patience, not speed
Cutting oversized porcelain is a sequential discipline. Each stage—sourcing flat stock, setting up proper support, selecting the right blade, controlling feed speed—builds on the last. Rushing any single step introduces risk that cascades into the next. Respect the process, maintain your equipment, and the yield from each delivery will reflect that care.

 Arabic
 French
 Spanish
 Portuguese
 Deutsch
 Turkish
 Dutch
Dutch
 Italiano
 Russian
 Romaian
 Portuguese (Brazil)
 Greek
Greek
 ไทย
ไทย